Quick Start Guide

Quick Start Guide to DocControl

Quick Start Guide: Create User Accounts for Each User

The first step is to give each member of your project a DocControl account. There are three predefine account types: Administrators, Users, and Viewers. Administrators manage all the users, documents, and groups. Users can be assigned to upload, modify, and approve documents. Viewers can only access and download files.

  1. For this guide, we will create the following user accounts:
    1. An account with the username Staffand account type Viewer
    2. An account with the username Writerand account type User
    3. An account with the username Approverand account type User
  2. From the admin menu, select the ‘Manage Users’ option
  3. Click the ‘Add User’ heading to reveal the registration formDocument Control
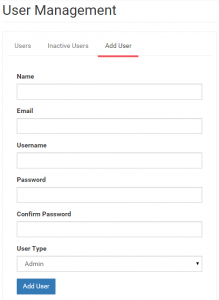
  4. Enter any name and provide a valid email address.
    1. A verification link to activate the account will be sent to the email address.
  5. Fill in the form in accordance to the users specified at the top
  6. Log into each email and click on the verification link to activate the respective account and complete the registration process.

The majority of your users will fall under the User or Viewers account type. To prevent unwarranted changes to your users or documents, try to limit the number of Administrators you assign. Document Control

Quick Start Guide: Create User Groups

User groups will help you manage the members of your project members. You can assign users to a user group and any permission you apply to the user group will also be applied the users within the group. Follow the steps below to create the user groups we will use in our project:

  1. For this guide, we will create a user group for each of the following:
    1. Project Staff– these users will be able to view and download specified files from your project. We will also assign them reviews to complete.
    2. SOP Writers– these users will be responsible for writing, uploading, and updating files for the project
    3. Project Manager– these users will be responsible for reviewing and approving the documents created by the document uploadersDocument Control
  2. From the admin menu, select the ‘Manage User Groups’ option
  3. Under User Groups, right click on ‘DocControl User Groups’ and click create
  4. Enter the name and click enter to create the user group

Document Control

Once you have created these user groups you are able to add users to them. You can substitute a user group in place of an individual user when assigning access privileges or approvers.

Quick Start Guide: Add User to User Groups

We will add the user accounts we created at the start of this guide into the user groups. After we add users to these user groups, we can use these groups when we define access permissions and set roles (i.e. document approvers).

Document Encryption and Control

  1. Within the ‘Manage User Groups’ option, check panel below the ‘Add Members’ heading
  2. Add a user to a group by first selecting a parent user group from the left User Group tree and selected users from Add Members panel.
  3. Add all of the users you created to the Project Staff user group. This is done by highlighting all their names using the Shift or Control (to select non-contiguous items) keys on Windows or the Command key on Mac.
  4. Add the user Writer to the SOP Writers user group.
  5. Assign yourself and the Approver account to the Project Manager user group.

Quick Start Guide: Managing Document Group Properties

After we’ve created the document groups, we need to assign permissions and properties to them so our users can access them. Properties that are applied to a document group will be inherited by any sub document groups and documents. To override inherited permissions, apply the permission directly to the document group or document.

  1. From the admin menu, select the ‘Settings Manager’ optionAccess Management for Documents
  2. Select the document group, My Starting Project, from the Hierarchy at left.
  3. Find “Access Permission” Panel and click on “+”
  4. Add the access permission Read Only Accessto the Project Staff user group. This allows everyone we assigned to the user group beforehand the permission to view the document group and its sub document groups or documents.
  5. Add the access permission Read + Write Accessto the user group SOP Writers. In addition to viewing the document group and its documents, this will allow users in that group to upload new documents and modify them.
  6. Find ‘Add Approvers’ panel and click “+”
  7. Add the user group Project Manager as an approver. The users we assigned to this group will be notified of any approval request for documents added or modified by the SOP Writers. They must review and approve these files in order for them to become accessible to the document group.Accessing Documents
  8. Next we will add a deadline to the document group, click on “gear” sign ‘Deadline’ tag under Settings heading.
  9. Enter ‘14’ into the text field to add a 2 week deadline to the document group. The system will email approvers to remind them to complete their approvals before the deadline.
  10. If we want to schedule a bi-annual review for documents in the project, we can assign an approval interval. Documents with an approval interval will expire if they are not reapproved by a document approver before the approval cycle passes.

Now we are set up and ready to go. If you have activated the Staff, Writer, and Approver accounts, you can log into them and see the differences in the user interface. The Staff account does not have access to upload documents or enter the admin menu. The Writer and Approver accounts can upload documents but cannot access the admin menu.

Access Permissions

Quick Start Guide: Create Document Groups

Document groups are folders that organize the documents users upload to DocControl. Similar to user groups, you can assign access permissions and set various properties to document groups that are inherited by the documents inside.

Document Management Control

  1. From the admin menu, select the ‘Hierarchy Manager’ option
  2. Right click on the DocControl which is root of the Hierarchy Tree and click “Create”. Enter the name My Starting Projectand click enter.

This will create the document group, My Starting Project. We will upload all the documents for our project into this document group. If you want to organize your documents further you can create sub document groups for your project. To do this, right click on Parent Group ‘My Starting Project’ and click “Create” to create a group within the group. You can create as many sub document groups as you like to organize your projects.


Quick Start Guide: Adding Your First Document

Log into the Writer account with the credentials you entered and upload a document to the My Starting Project document group. Follow the steps below:Add Document Document Management

  1. Click the ‘Add Document’ button at left side panel on Dashboard.
  2. Click ‘Add files…’ to select the file to add from your local drive.
  3. Document name will be pre filled with the file name. Update the name if required.
  4. Select a document group to upload the document to from right panel. Once uploaded, the document will inherit the permissions of the selected group.
      • You can also view and override the default settings of Document by clicking on Approvers, Reviewers and Owners buttons.
  1. You can also select multiple files for upload (max 10 files at a time).
  2. Click on “Upload” to upload all selected documents or click upload icon near individual document to upload a particular document.
  3. Click “View” button that appears, if document upload is successful, to view document details page.Document Upload
  4. Click ‘Request Approval’ from the document details page to request document approval from the assigned document approvers.
    Document Add Into System

The document approvers assigned to the document or document group will be notified of your request. They must approve your request before the document is accessible to other users from the dashboard. Continue on to the next section to learn how to approve a document request.

Quick Start Guide: Approving a Document

Next, log back onto your account, you will notice that there is a counter at the top next to your profile picture. These are your notifications. It will contain a notification for your approval for the document. Click on the notification to see the documents that require your approval. In this case, you will see the document you have just added. This document requires approval from you and the Approver account you added to the Project Manager user group. All the users in the group must approve this document before other users can access it on their dashboard. Approve this document by following the steps below:

  1. Locate documents that require your approval by doing one of the following:
    1. Click on the notification counternext to the profile picture
    2. Click on the ‘Pending My Approval’ Quick Filter
  2. Find the document you want to approve.
  3. Click on “I” icon to view extra detail. Click on top right icon to go to the view document details page.
  4. Click the “Approve “ or “Reject” button corresponding to your choke.
  5. Review the document by either:
    1. Click on ‘View’ to download in PDF format
    2. Click on ‘Download Original’ to download the original format
  6. Optional: You can add as many comments as you want for your approval or rejection.
  7. Choose ‘Approve

Document Approval for Posting


After all approvers have approved the document, it is accessible from the dashboard by users with Read access. If you log onto the Viewer account, you can now select the document group and download the document in PDF format.

There are added benefits from distributing the members of your project into roles defined by user groups. If you wanted to remove a user’s access permissions, you can remove them from the user group instead of updating their permissions for each document. If someone leaves the project, instead of removing them from every document group and document, you simply have to remove them from a user group.

Quick Start Guide: Revising a Document

Suppose your Writer wanted to make revisions to the document you just approved. Log into the Writer account and check-out the document to make those changes. Follow the steps below to check-out a document and revise it.

  1. If you are the document owner you can checkout and revise documents
  2. Locate the document you recently approved from the dashboard
  3. Click on ‘Checkout’
  4. Select ‘OK’ from the popup to confirm the checkout and download the document

Because this is the first revision of the document, you will download a copy of the original uploaded file. If the document was revised before, you would have downloaded the previous checked in copy of the file. This allows owners to download the editable version of the document instead of a PDF. Open and edit the file with your word processor, in this case I used Microsoft Word. Once you have finished and saved your revisions, follow the steps below to check-in your document.

  1. Locate the document you checked out on the dashboard by selecting ‘My Checkouts’ from Quick Filters
  2. Locate the document you recently checked out form the dashboard
  3. Click ‘Check-in’. The browser will be directed to Check-in Document Page.
  4. Click ‘Add File’Document Revision System
  5. Select the revised file from the local drive to upload.
  6. Choose the revision type.
    1. Major – increments the revision number to the next whole integer (i.e. 1.4 to 2.0)
    2. Minor – increments the revision number by a point (i.e. 1.2 to 1.3)
  7. Leave a message for the approver regarding the new document using the Check-in Message textbox

Click on My Starting Project from the document tree to find both versions of the document on the dashboard. However, only version 1.0 has been approved whereas the checked-in version is currently a draft. The checked in version needs to be approved. Click on ‘Request Approval’ to notify the document approvers of the revision. If you log into your administrator and Approver accounts, they will each receive a notification regarding the approval of the revision. Once both accounts approve the revision, the new version will be available in PDF format for all users.


Quick Start Guide: Retiring a Document

Now that we have learned how to upload, approve, and revise a document we will cover how to retire a document that is outdated or no longer needed. We will retire the first document we uploaded into DocControl. You must have a User or Administrator account type to request the retirement of a document. Follow the steps below to retire a document.

Retiring a Document

  1. Click on My Starting Projectfrom the document tree
  2. Locate and select the document you want to retire.
  3. Click on ‘Request Retirement’ from the document properties bar
  4. You will be asked to specify the retirement reason.
  5. Click ‘Request Retirement’ to confirm the request.

Document Removal

A retirement request will be sent to both the approvers we assigned. They must review and approve this request before the document is retired. If a document is retired it will no longer be accessible from the dashboard. Only administrators can access retired documents through the ‘Document Archive’ or ‘Retired Documents’ report. A retired document is no longer part of the document group. If the document approvers reject the retirement request, the document will still be accessible from the dashboard.